What exactly can AI vision do?
AI vision technology shines in numerous fields, such as:
- Image Classification: In retail and e-commerce, it automatically categorizes product images to improve inventory management efficiency.
- Object Detection: In autonomous driving, it identifies road signs, traffic lights, pedestrians, and other vehicles to provide a basis for vehicle decision-making.
- Image Segmentation: In medical image analysis, it accurately segments lesion areas to assist doctors in diagnosis.
- Object Tracking: In motion analysis, it performs real-time tracking and analysis of athletes’ movements to support sports training and rehabilitation.
- OCR Character Recognition: In license plate recognition, it quickly and accurately identifies vehicle license plate numbers.
- Image Generation: In virtual reality, it creates realistic virtual environments to enhance user experience.
YOLO: The “Bright Star” of Object Detection
As a core field of AI vision, object detection can accurately identify and locate targets in images or video frames. Since the emergence of YOLO, this field has undergone a revolutionary transformation.
In 2015, Joseph Redmon, a PhD student at the University of Washington, first proposed the YOLO (You Only Look Once) object detection algorithm. This algorithm cleverly integrates region proposal and classification into a single neural network, completely innovating real-time object detection, significantly reducing computation time, and enabling efficient end-to-end learning.
After leading the maintenance of YOLOv3, Joseph Redmon stopped developing subsequent versions due to concerns that his research might be used for military or malicious purposes (e.g., autonomous weapons like drones, surveillance systems, etc.), which conflicted with his academic original intention. He believed that AI technology should serve social welfare rather than exacerbate security risks.
The Logic Behind YOLO Algorithm
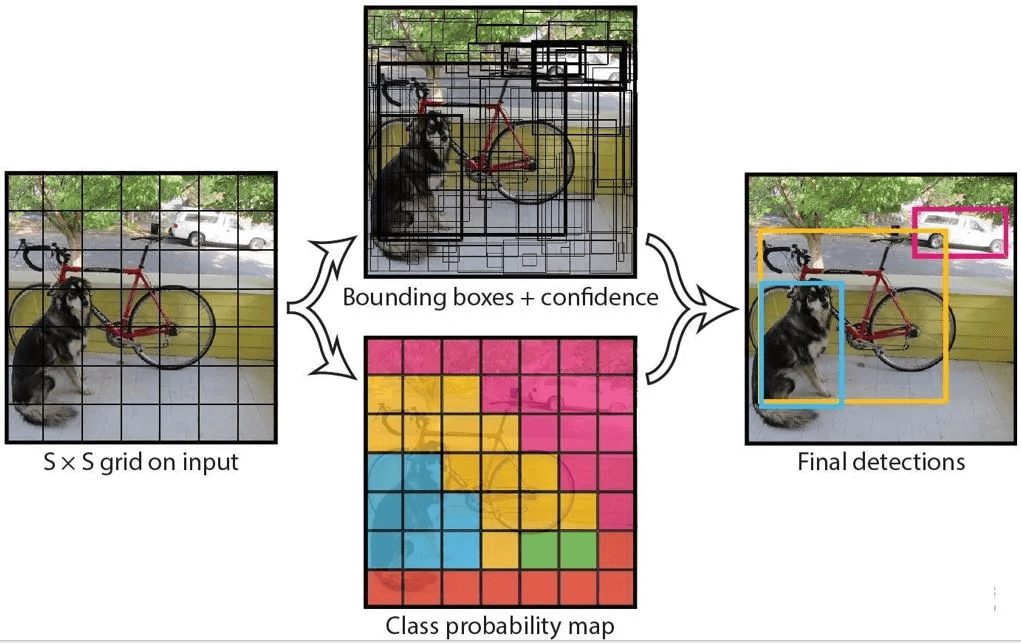
The YOLO algorithm divides the input image into S×S grid cells, just like cutting a cake. It then uses convolution to extract features, generating a feature map. Each grid cell in the feature map acts like a small detective, corresponding to a grid cell in the original image and responsible for finding targets. If the center of a target falls within a grid cell, the “detective” predicts the target’s size, shape, and category. This is YOLO’s core idea—simple and straightforward.
| Traditional Algorithms (e.g., R-CNN) | YOLO Algorithm |
|---|---|
| Step-by-step processing: First find candidate regions, then classify | One-step processing: Directly predict in grids |
| May take seconds to process one image | Only 0.01 seconds to process one image (real-time) |
| Like finding targets with a magnifying glass—slow but potentially more accurate | Like scanning with eyes—fast and sufficiently accurate |
Unveiling the YOLO Family
Since its debut in 2015, YOLO has evolved from version V1 to V11 through multiple iterations. Each version has unique features and is suitable for different scenarios.
Detailed Introduction to Each Model:

| Version | Release Date | Key Features & Improvements |
|---|---|---|
| YOLOv1 | 2015 | First single forward pass, fast detection speed; low small object detection accuracy and high positioning error |
| YOLOv2 | 2016 | Introduced anchor boxes, improved small object detection, and enhanced model robustness |
| YOLOv3 | 2018 | Used Darknet-53, introduced FPN (Feature Pyramid Network), and improved detection capability for multi-scale targets |
| YOLOv4 | 2020 | Integrated CSP connections and Mosaic data augmentation, balancing training strategies and inference costs |
| YOLOv5 | June 2020 | Developed with PyTorch, significantly improved usability and performance, becoming a popular choice |
| YOLOv6 | 2022 | Developed by Meituan, optimized model structure and training strategies to improve detection accuracy and speed |
| YOLOv7 | 2022 | Improved balance between lightweight design and accuracy, introduced new training technologies and optimization methods |
| YOLOv8 | 2023 | Anchor-free detection head, advanced backbone network, optimized accuracy and speed, supporting multiple vision tasks |
| YOLOv9 | 2024 | Introduced automated training and optimization technologies to improve model adaptability and detection performance |
| YOLOv10 | 2024 | Ultra-large-scale model, enhanced generalization ability and real-time performance for complex scenarios |
| YOLOv11 | October 2024 | Innovative model structure and training methods, improved detection accuracy and efficiency |
Why Choose YOLOv5?
For fast object detection after capturing camera images, YOLOv5 is an excellent choice due to the following features:
- High Accuracy & Efficiency: YOLOv5 maintains high detection accuracy while offering extremely fast inference speed. It can quickly detect targets in real-time video streams, making it suitable for scenarios requiring rapid processing of large amounts of image data.
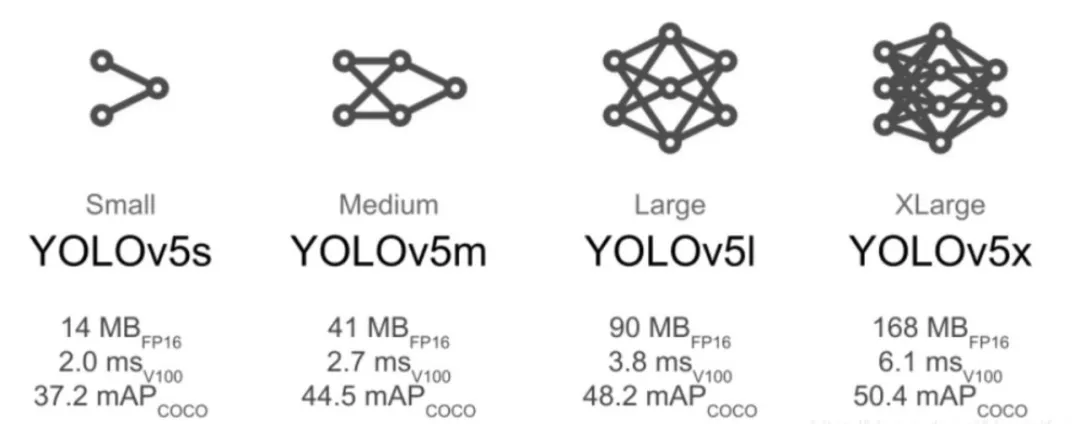
- Multi-version Support: YOLOv5 provides multiple versions (e.g., n, s, m, l, x). Users can choose models of different sizes based on their needs. For resource-constrained devices (e.g., mobile devices), lightweight versions like YOLOv5n are ideal; for high-precision requirements, larger versions like YOLOv5x are recommended.
- Easy Deployment: Developed based on PyTorch—a popular deep learning framework with strong community support and abundant resources—YOLOv5 features readable and modifiable code for customized development. Its clear code structure and complete training/inference scripts simplify the process from model training to deployment. It also supports multiple export formats (e.g., ONNX, TorchScript) for cross-platform deployment.
- Active Community: YOLOv5 has a highly active community, where developers can easily find numerous tutorials, pre-trained models, and use cases. This allows beginners to get started quickly and receive timely help when encountering issues.
5-Step Guide to Installing & Using YOLO
Step 1: Download YOLOv5 Source Code
Method 1: Download from GitHub
YOLOv5 GitHub Repository: https://github.com/ultralytics/yolov5
Method 2: Clone via Command Line
With Python installed (Python 3.8+ recommended), run the following command in the terminal to clone the YOLOv5 source code from GitHub:
git clone https://github.com/ultralytics/yolov5.git
Method 3: Download via Domestic Mirrors
If you experience slow access to GitHub in China, use domestic mirror sites to download the source code. For example, clone from the Gitee mirror:
git clone https://gitee.com/monkeycc/yolov5.git
You can also download via shared cloud disk links provided by domestic developers.
Step 2: Familiarize Yourself with the YOLOv5 File Structure
After cloning the repository, you will see the following file structure. Understanding the purpose of each folder and file will help you use the model more effectively during training and inference:
plaintext
yolov5/
├── data/          # Stores datasets
├── models/        # Stores pre-trained model files and model configuration files
├── runs/          # Stores runtime results (detection results, training results, etc.)
├── utils/         # Contains utility functions for various tasks
├── weights/       # Stores model weight files
├── .gitignore
├── detect.py      # Detection script for object detection on images/videos
├── train.py       # Training script for model training
├── val.py         # Validation script for model performance evaluation
└── requirements.txt  # Lists required dependency packages
Step 3: Install Dependencies
YOLOv5 requires several third-party Python packages to run. The complete list is in the requirements.txt file. Install them with the following command:
pip install -r requirements.txt
This command automatically installs all required packages (e.g., NumPy, OpenCV). For faster downloads in China, use a domestic PyPI mirror (e.g., Tsinghua University):
pip install -r requirements.txt -i https://pypi.tuna.tsinghua.edu.cn/simple
Note: To avoid dependency conflicts between projects, it is recommended to use Conda or a virtual environment to manage packages when installing YOLO.
Step 4: Download Pre-trained Models
Official pre-trained models are trained on the COCO dataset and have learned general target features (e.g., shape, texture, color), equivalent to having “basic cognitive abilities” to recognize over 80 types of objects (e.g., humans, vehicles, animals). During fine-tuning, the model builds on this existing knowledge to optimize for new tasks, avoiding “learning from scratch” and improving training efficiency and performance.
YOLOv5 offers multiple pre-trained models (e.g., yolov5s.pt, yolov5m.pt). Download them from the official releases page: https://github.com/ultralytics/yolov5/releases
Step 5: Test Model Inference
After completing the first four steps, verify that the model works correctly by running inference with the official pre-trained model.
Example: Detect an Image with Apples and Oranges
- Place an image named
test.jpg(containing alternating apples and oranges) in theyolov5/data/imagesdirectory. - Navigate to the YOLOv5 root directory and run the following command to detect the image using the
yolov5s.ptpre-trained model and the built-indetect.pyscript:python detect.py --weights yolov5s.pt --source data/images/test.jpg
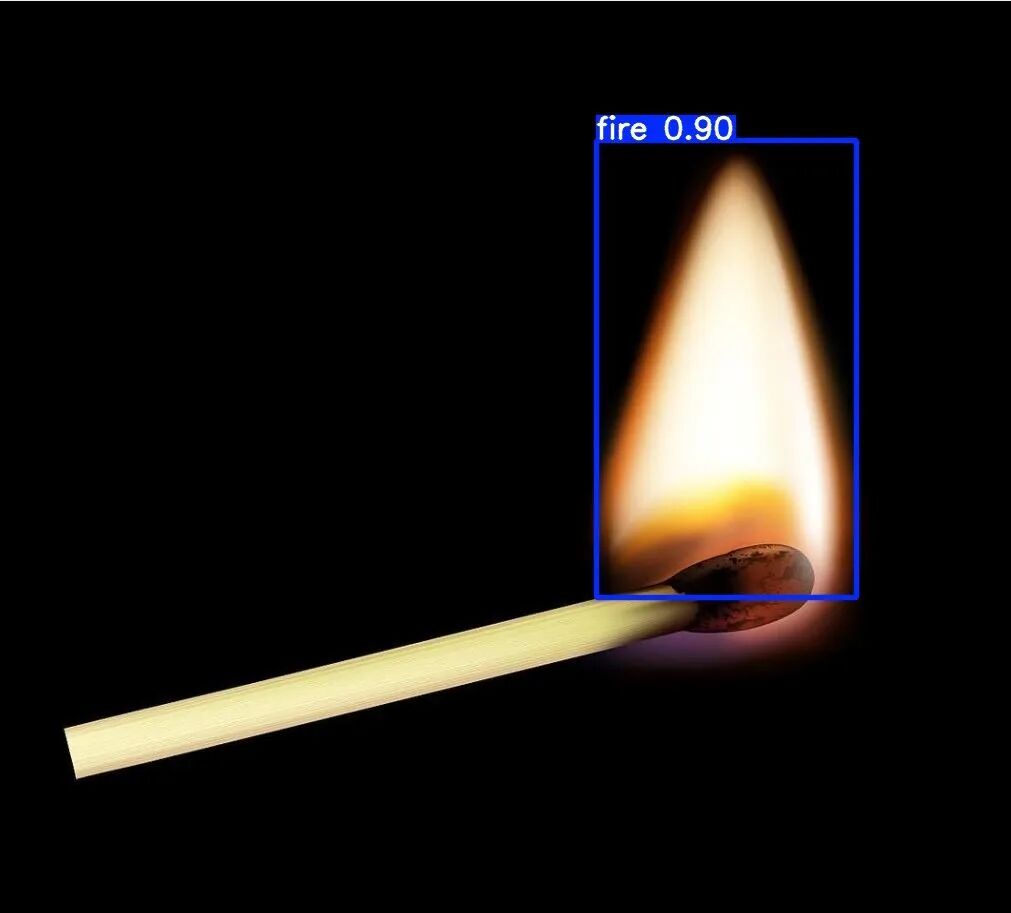
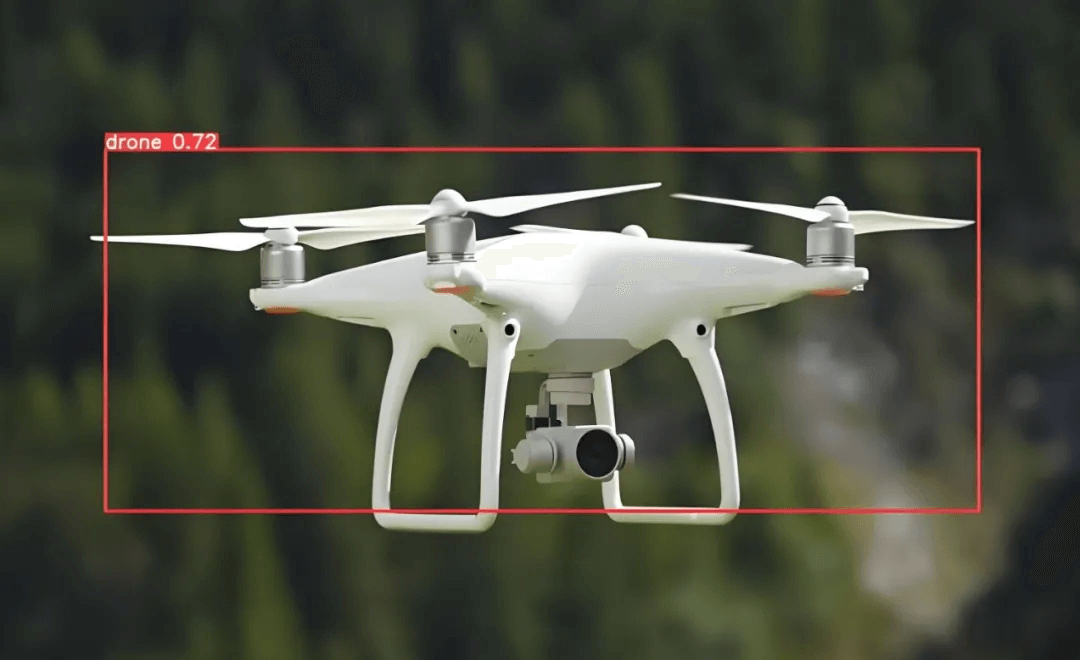
Detection Result
The result is automatically saved in the yolov5/runs/detect directory. The output image will include detection boxes and confidence scores.
The model is now ready for automatic inference and detection!
Conclusion
Through this tutorial, you should have a basic understanding of AI vision and YOLO object detection. In the next part, we will cover model training and rapid AI image annotation for datasets.