5 Open-Source IoT GitHub Projects: Home Assistant, ESPHome, Tasmota, OpenHAB
Hey everyone, have you ever felt this frustration? You bought a bunch of smart devices, your phone is cluttered with apps, turning on a light requires tapping one app, adjusting the temperature requires another—it feels less like you’re in control of smart technology and more like you’re being controlled by it. Don’t worry! Today, I’m introducing five open-source IoT projects that are free, easy to use, and highly customizable. Say goodbye to chaos and hello to a seamlessly smart home!
1. Home Assistant
Overview
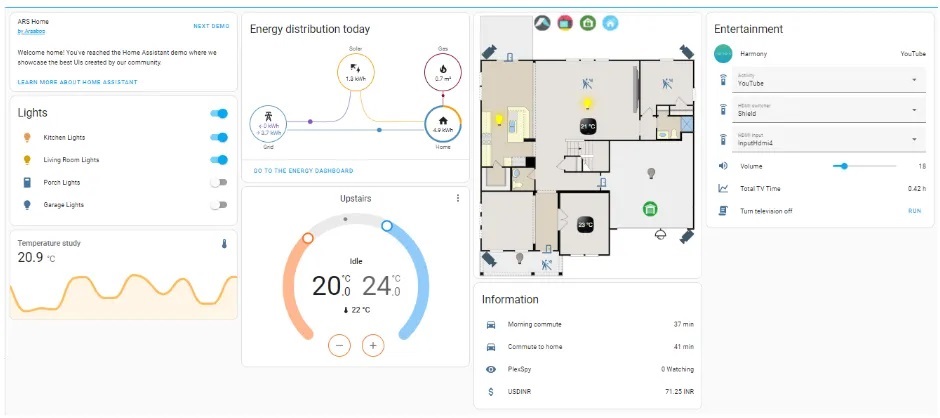
Home Assistant is like the universal remote of the IoT world. It integrates smart devices from various brands—whether it’s Xiaomi, Huawei, or international brands—into a single platform for centralized management. It’s frequently updated and has an active community. Basically, if you can think of a device, Home Assistant can probably support it.
Key Features
- Unified device control
- Automation scenarios (e.g., “Welcome Home” mode to automatically turn on lights and AC)
- Data tracking (energy consumption, temperature changes, etc.)
- Voice control support (Alexa, Google Assistant, and even some local voice assistants)
Use Cases
Perfect as a smart home hub. Whether you’re renting or owning a home, you can use it without replacing your existing devices to achieve a fully connected smart home.
How to Use
The easiest way is to deploy via Docker. Run the following command in your terminal (remember to customize the path):
bash
docker run -d \
  --name homeassistant \
  --privileged \
  --restart=unless-stopped \
  -e TZ=Asia/Shanghai \
  -v /your/custom/path:/config \
  -p 8123:8123 \
  ghcr.io/home-assistant/home-assistant:stable
Then open your browser and go to http://your-ip:8123. Follow the setup wizard—even beginners can get it up and running easily.
Comparison
It outperforms similar tools in compatibility and user-friendliness. However, it requires relatively better hardware (e.g., Raspberry Pi 4 or above).
GitHub Repository
https://github.com/home-assistant/core
2. ESPHome
Overview
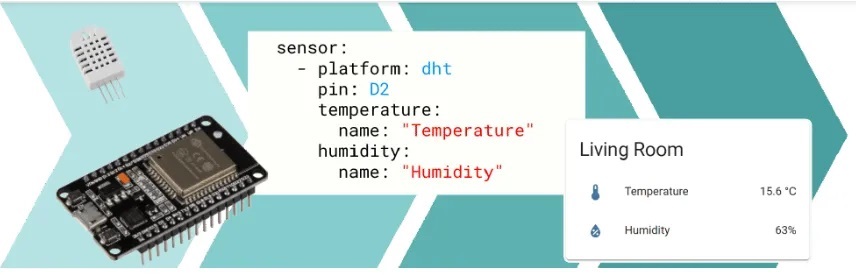
If you’ve ever tinkered with ESP8266 or ESP32 boards, ESPHome will be your dream tool. Instead of writing complex code, you can program these boards using simple YAML configuration files. It even supports over-the-air (OTA) updates—a true blessing for lazy makers!
Key Features
- Firmware development for ESP chips
- Sensor data collection (temperature, humidity, light, etc.)
- Relay/LED control
- Seamless integration with Home Assistant
Use Cases
Ideal for DIY smart devices, such as a temperature-humidity sensor for your fridge or a smart switch for your aquarium light—all at a cost of just a few dollars.
How to Use
First, install Python, then use pip to install ESPHome:
bash
pip install esphomeCreate a new configuration file:
bash
esphome wizard my_device.yamlModify the sensor models and Wi-Fi settings in the configuration file, then upload the firmware:
bash
esphome run my_device.yamlThat’s it! The board will connect to Wi-Fi and can sync data with Home Assistant in real time.
Comparison
Ten times easier than writing Arduino code. Perfect for beginners, but only supports ESP-series chips.
GitHub Repository
https://github.com/esphome/esphome
3. Tasmota
Overview
Tasmota is a custom firmware specifically designed for smart switches and sockets. It “jailbreaks” restricted vendor-locked devices, freeing them from proprietary apps and allowing integration with various smart home platforms. It supports a vast number of device models—just search “Tasmota + [your device model],” and you’ll likely find a tutorial.
Key Features
- Breaks vendor restrictions
- MQTT support (enables communication with other platforms)
- Local control (faster response and improved security without relying on cloud servers)
- Scheduling and power monitoring
Use Cases
Great for modifying smart switches, sockets, and lights. For example, you can flash a Xiaomi smart plug with Tasmota to control it outside the Mi Home app and integrate it with Home Assistant.
How to Use
Find a tutorial for your specific device (usually involving disassembly and wiring). After flashing, connect to its Wi-Fi network and configure via the web interface:
- Connect to your home Wi-Fi (under Configuration → WiFi)
- Set up MQTT (enter your MQTT server address, e.g., from Home Assistant)
- Save, reboot, and you’re done!
Comparison
More features and stability compared to stock firmware, but requires some technical skill (disassembly and flashing).
GitHub Repository
https://github.com/arendst/Tasmota
4. OpenHAB
Overview
OpenHAB is a well-established IoT platform similar to Home Assistant but more geared toward tech-savvy users. It supports a wide range of protocols, from outdated infrared to modern Zigbee, and is highly extensible—you can even write your own plugins.
Key Features
- Unified device control
- Flexible automation rules (more customizable than Home Assistant)
- Multi-user permission management
- Secure remote access
Use Cases
Ideal for users with diverse devices and protocols, or those who want to create complex automations (e.g., triggering devices based on weather, calendar events, or stock prices).
How to Use
Deploy with Docker:
bash
docker run -d \
  --name openhab \
  --net=host \
  -v /your/config/path:/openhab/conf \
  -v /your/data/path:/openhab/userdata \
  -v /your/logs/path:/openhab/logs \
  -e USER_ID=1000 \
  -e GROUP_ID=1000 \
  -e OPENHAB_HTTP_PORT=8080 \
  -e OPENHAB_HTTPS_PORT=8443 \
  openhab/openhab:latest
Visit http://your-ip:8080, install the required binding plugins under Add-ons, and start adding devices.
Comparison
More powerful but has a steeper learning curve. Best for tech enthusiasts; beginners might find it complex.
GitHub Repository
https://github.com/openhab/openhab-distro
5. Eclipse Mosquitto
Overview
Mosquitto is a lightweight MQTT message broker—essentially a “post office” for IoT devices. Devices use it to send and receive messages (e.g., a sensor reports “temperature is 30°C,” and a controller responds with “turn on the AC”). It’s efficient, stable, and resource-friendly.
Key Features
- MQTT message routing
- Secure connections (SSL/TLS)
- User authentication
- Message persistence (messages are retained even after disconnections)
Use Cases
Useful in any scenario requiring device communication: smart home automation, industrial sensor networks, drone remote control—almost all IoT projects rely on it.
How to Use
Launch with Docker:
bash
docker run -d \
  --name mosquitto \
  -p 1883:1883 \
  -p 9001:9001 \
  -v /your/config/path:/mosquitto/config \
  -v /your/data/path:/mosquitto/data \
  -v /your/logs/path:/mosquitto/log \
  eclipse-mosquitto:latest
Set your MQTT server address to your device’s IP and port 1883, and devices can start communicating.
Comparison
One of the most popular MQTT brokers. Lightweight enough to run on a Raspberry Pi Zero, but it doesn’t control devices directly—it works together with other platforms.
GitHub Repository
https://github.com/eclipse/mosquitto
Related articles