In daily work, we often use tasks that need to be executed periodically. One way is to use the crond that comes with the Linux system combined with the command line, and the other way is to use Python directly.
Recently, I have sorted out the implementation methods of Python scheduled tasks. The content is relatively long, so it is recommended to save it for later study. It is not easy to sort out. If you gain something, please like and support it.
Let’s start learning!
Table of Contents
- Implement Scheduled Tasks Using while True: + sleep()
- Run Scheduled Tasks Using the Timeloop Library
- Implement Scheduled Tasks Using threading.Timer
- Implement Scheduled Tasks Using the Built-in sched Module
- Implement Scheduled Tasks Using the Schedule Scheduling Module
- Implement Scheduled Tasks Using the Task Framework APScheduler
- Implement Scheduled Tasks Using the Distributed Message System Celery
- Implement Scheduled Tasks Using the Data Flow Tool Apache Airflow
1. Implement Scheduled Tasks Using while True: + sleep()
The sleep(secs) function in the time module can pause the currently executing thread for secs seconds before continuing execution. The so-called pause means putting the current thread into a blocked state, and when the time specified by the sleep() function is reached, it will switch from the blocked state to the ready state, waiting for CPU scheduling.
Based on this feature, we can implement simple scheduled tasks through a while infinite loop + sleep().
Code Example:
import datetime
import time

def time_printer():
    now = datetime.datetime.now()
    ts = now.strftime('%Y-%m-%d %H:%M:%S')
    print('do func time :', ts)

def loop_monitor():
    while True:
        time_printer()
        time.sleep(5)  # Pause for 5 seconds

if __name__ == "__main__":
    loop_monitor()
Main Disadvantages:
- Only the interval can be set, and a specific time cannot be specified, such as 8:00 every morning.
- Sleep is a blocking function, which means that during the sleep period, the program cannot perform any operations.
2. Run Scheduled Tasks Using the Timeloop Library
Timeloop is a library that can be used to run multi-periodic tasks. It is a simple library that uses the decorator pattern to run marked functions in threads.
Example Code:
import time
from timeloop import Timeloop
from datetime import timedelta

tl = Timeloop()

@tl.job(interval=timedelta(seconds=2))
def sample_job_every_2s():
    print "2s job current time : {}".format(time.ctime())

@tl.job(interval=timedelta(seconds=5))
def sample_job_every_5s():
    print "5s job current time : {}".format(time.ctime())

@tl.job(interval=timedelta(seconds=10))
def sample_job_every_10s():
    print "10s job current time : {}".format(time.ctime())
3. Implement Scheduled Tasks Using threading.Timer
Timer in the threading module is a non-blocking function, which is slightly better than sleep. The most basic understanding of timer is a timer. We can start multiple scheduled tasks. These timer tasks are executed asynchronously, so there is no problem of waiting for sequential execution.
Timer(interval, function, args=[ ], kwargs={ })
- interval: Specified time
- function: Method to be executed
- args/kwargs: Parameters of the method
Code Example:
Note: Timer can only be executed once. It needs to be called in a loop here, otherwise it can only be executed once.
4. Implement Scheduled Tasks Using the Built-in sched Module
The sched module implements a general-purpose event scheduler. The scheduler class uses a delay function to wait for a specific time to execute tasks. It also supports multi-threaded applications. After each task is executed, the delay function is called immediately to ensure that other threads can also execute.
class sched.scheduler(timefunc, delayfunc) This class defines a general interface for scheduling events. It needs two parameters passed in from the outside. timefunc is a function that takes no parameters and returns a time-type number (such as time in the time module is commonly used). delayfunc should be a function that needs one parameter to call, is compatible with the output of timefunc, and functions to delay multiple time units (such as sleep in the time module is commonly used).
Code Example:
import datetime
import time
import sched

def time_printer():
    now = datetime.datetime.now()
    ts = now.strftime('%Y-%m-%d %H:%M:%S')
    print('do func time :', ts)
    loop_monitor()

def loop_monitor():
    s = sched.scheduler(time.time, time.sleep)  # Generate scheduler
    s.enter(5, 1, time_printer, ())
    s.run()

if __name__ == "__main__":
    loop_monitor()
Main Methods of the Scheduler Object:
- enter(delay, priority, action, argument): Arranges an event to be delayed by delay time units.
- cancel(event): Removes an event from the queue. If the event is not an event in the current queue, this method will throw a ValueError.
- run(): Runs all scheduled events. This function will wait (using the delayfunc() function passed to the constructor), then execute the events until there are no more scheduled events.
Personal Comment: Better than threading.Timer, no need for loop calls.
5. Implement Scheduled Tasks Using the Schedule Scheduling Module
Schedule is a third-party lightweight task scheduling module that can execute tasks according to seconds, minutes, hours, dates, or custom events. Schedule allows users to use simple and humanized syntax to run Python functions (or other callable functions) regularly at predetermined time intervals.
First, let’s look at the code. Can you understand what it means without reading the documentation?
import schedule
import time

def job():
    print("I'm working...")

schedule.every(10).seconds.do(job)
schedule.every(10).minutes.do(job)
schedule.every().hour.do(job)
schedule.every().day.at("10:30").do(job)
schedule.every(5).to(10).minutes.do(job)
schedule.every().monday.do(job)
schedule.every().wednesday.at("13:15").do(job)
schedule.every().minute.at(":17").do(job)

while True:
    schedule.run_pending()
    time.sleep(1)
Decorator: Decorate static methods through @repeat()
import time
from schedule import every, repeat, run_pending

@repeat(every().second)
def job():
    print('working...')

while True:
    run_pending()
    time.sleep(1)
Passing Parameters:
import schedule

def greet(name):
    print('Hello', name)

schedule.every(2).seconds.do(greet, name='Alice')
schedule.every(4).seconds.do(greet, name='Bob')

while True:
    schedule.run_pending()
Decorators Can Also Pass Parameters:
from schedule import every, repeat, run_pending

@repeat(every().second, 'World')
@repeat(every().minute, 'Mars')
def hello(planet):
    print('Hello', planet)

while True:
    run_pending()
Canceling Tasks:
import schedule

i = 0

def some_task():
    global i
    i += 1
    print(i)
    if i == 10:
        schedule.cancel_job(job)
        print('cancel job')
        exit(0)

job = schedule.every().second.do(some_task)

while True:
    schedule.run_pending()
Running a Task Once:
import time
import schedule

def job_that_executes_once():
    print('Hello')
    return schedule.CancelJob

schedule.every().minute.at(':34').do(job_that_executes_once)

while True:
    schedule.run_pending()
    time.sleep(1)
Retrieving Tasks by Tag:
# Retrieve all tasks: schedule.get_jobs()
import schedule

def greet(name):
    print('Hello {}'.format(name))

schedule.every().day.do(greet, 'Andrea').tag('daily-tasks', 'friend')
schedule.every().hour.do(greet, 'John').tag('hourly-tasks', 'friend')
schedule.every().hour.do(greet, 'Monica').tag('hourly-tasks', 'customer')
schedule.every().day.do(greet, 'Derek').tag('daily-tasks', 'guest')

friends = schedule.get_jobs('friend')
print(friends)
Canceling Tasks by Tag:
# Cancel all tasks: schedule.clear()
import schedule

def greet(name):
    print('Hello {}'.format(name))
    if name == 'Cancel':
        schedule.clear('second-tasks')
        print('cancel second-tasks')

schedule.every().second.do(greet, 'Andrea').tag('second-tasks', 'friend')
schedule.every().second.do(greet, 'John').tag('second-tasks', 'friend')
schedule.every().hour.do(greet, 'Monica').tag('hourly-tasks', 'customer')
schedule.every(5).seconds.do(greet, 'Cancel').tag('daily-tasks', 'guest')

while True:
    schedule.run_pending()
Running Tasks Until a Certain Time:
import schedule
from datetime import datetime, timedelta, time

def job():
    print('working...')

schedule.every().second.until('23:59').do(job)  # Stop at 23:59 today
schedule.every().second.until('2030-01-01 18:30').do(job)  # Stop at 18:30 on 2030-01-01
schedule.every().second.until(timedelta(hours=8)).do(job)  # Stop after 8 hours
schedule.every().second.until(time(23, 59, 59)).do(job)  # Stop at 23:59:59 today
schedule.every().second.until(datetime(2030, 1, 1, 18, 30, 0)).do(job)  # Stop at 18:30 on 2030-01-01

while True:
    schedule.run_pending()
Running All Tasks Immediately (Mainly for Testing):
import schedule

def job():
    print('working...')

def job1():
    print('Hello...')

schedule.every().monday.at('12:40').do(job)
schedule.every().tuesday.at('16:40').do(job1)

schedule.run_all()
schedule.run_all(delay_seconds=3)  # Delay 3 seconds between tasks
Parallel Execution: Implemented Using Python’s Built-in Queue:
import threading
import time
import schedule

def job1():
    print("I'm running on thread %s" % threading.current_thread())

def job2():
    print("I'm running on thread %s" % threading.current_thread())

def job3():
    print("I'm running on thread %s" % threading.current_thread())

def run_threaded(job_func):
    job_thread = threading.Thread(target=job_func)
    job_thread.start()

schedule.every(10).seconds.do(run_threaded, job1)
schedule.every(10).seconds.do(run_threaded, job2)
schedule.every(10).seconds.do(run_threaded, job3)

while True:
    schedule.run_pending()
    time.sleep(1)
6. Implement Scheduled Tasks Using the Task Framework APScheduler
APScheduler (Advanced Python Scheduler) is a Python scheduled task framework based on Quartz, which implements all the functions of Quartz and is very easy to use. It provides tasks based on dates, fixed time intervals, and crontab types, and can persist tasks. Based on these functions, we can easily implement a Python scheduled task system.
It has the following three characteristics:
- Scheduler similar to Linux Cron (optional start/end time)
- Execution scheduling based on time intervals (periodic scheduling, optional start/end time)
- One-time execution tasks (run once at a set date/time)
APScheduler has four components:
- Trigger: Contains scheduling logic. Each job has its own trigger, which is used to determine when the next job will run. In addition to their initial configuration, triggers are completely stateless.
- Job Store: Stores scheduled jobs. The default job store simply saves jobs in memory. Other job stores save jobs in databases. A job’s data will be serialized when saved in a persistent job store and deserialized when loaded. Schedulers cannot share the same job store.
- Executor: Handles the running of jobs. They usually do this by submitting the specified callable object in the job to a thread or process pool. When the job is completed, the executor will notify the scheduler.
- Scheduler: Is the other component. You usually have only one scheduler in your application. Application developers usually do not directly deal with job stores, schedulers, and triggers. Instead, the scheduler provides appropriate interfaces to handle these. Configuring job stores and executors can be done in the scheduler, such as adding, modifying, and removing jobs. By configuring the executor, jobstore, and trigger, using a thread pool (ThreadPoolExecutor default 20) or process pool (ProcessPoolExecutor default 5), and allowing a maximum of 3 (max_instances) task instances to run simultaneously, scheduling control such as adding, deleting, modifying, and querying jobs is achieved.
Example Code:
from apscheduler.schedulers.blocking import BlockingScheduler
from datetime import datetime

# Output time
def job():
    print(datetime.now().strftime("%Y-%m-%d %H:%M:%S"))

# BlockingScheduler
sched = BlockingScheduler()
sched.add_job(job, 'interval', seconds=5, id='my_job_id')
sched.start()
6.1 Job
Job is the smallest execution unit of APScheduler. When creating a Job, specify the function to be executed, the parameters required in the function, and some setting information when the Job is executed.
Construction Description:
- id: Specifies the unique ID of the job
- name: Specifies the name of the job
- trigger: The trigger defined by apscheduler, used to determine the execution time of the Job. According to the set trigger rules, calculate the next time this job will be executed, and it will be executed when the time is met.
- executor: The executor defined by apscheduler. When creating a Job, set the name of the executor. According to the string name, obtain the executor that executes this job from the scheduler, and execute the function specified by the job.
- max_instances: The maximum number of instances for executing this job. When the executor executes the job, it calculates the number of executions according to the job’s id, and determines whether it can be executed according to the set maximum number of instances.
- next_run_time: The next execution time of the Job. You can specify a time [datetime] when creating the Job. If not specified, the trigger time will be obtained according to the trigger by default.
- misfire_grace_time: The delayed execution time of the Job. For example, the scheduled execution time of the Job is 21:00:00, but it is not executed until 21:00:31 due to service restart or other reasons. If this key is set to 40, the job will continue to be executed; otherwise, the job will be discarded.
- coalesce: Whether the Job is executed in a merged manner, which is a bool value. For example, if the scheduler is stopped for 20s and then restarted, and the job’s trigger is set to execute every 5s, this job will miss 4 execution times. If set to True, it will be merged into one execution; otherwise, it will be executed one by one.
- func: The function executed by the Job
- args: Positional parameters required by the Job execution function
- kwargs: Keyword parameters required by the Job execution function
6.2 Trigger
The Trigger is bound to the Job. When the scheduler schedules and filters the Job, it calculates the trigger time of the Job according to the trigger rules, and then compares it with the current time to determine whether the Job will be executed. In short, the next execution time is calculated according to the trigger rules.
Currently, APScheduler supports triggers:
- DateTrigger for specifying time
- IntervalTrigger for specifying interval time
- CronTrigger like Linux’s crontab.
Trigger Parameter: date
date timing, the job is executed only once.
- run_date (datetime|str) – the date/time to run the job at
- timezone (datetime.tzinfo|str) – time zone for run_date if it doesn’t have one already
sched.add_job(my_job, 'date', run_date=date(2009, 11, 6), args=['text'])
sched.add_job(my_job, 'date', run_date=datetime(2019, 7, 6, 16, 30, 5), args=['text'])
Trigger Parameter: interval
interval interval scheduling
- weeks (int) – interval in weeks
- days (int) – interval in days
- hours (int) – interval in hours
- minutes (int) – interval in minutes
- seconds (int) – interval in seconds
- start_date (datetime|str) – start date
- end_date (datetime|str) – end date
- timezone (datetime.tzinfo|str) – time zone
sched.add_job(job_function, 'interval', hours=2)Trigger Parameter: cron
cron scheduling
(int|str) indicates that the parameter can be of int type or str type
(datetime | str) indicates that the parameter can be of datetime type or str type
- year (int|str) – 4-digit year – (indicating a 4-digit year, such as 2008)
- month (int|str) – month (1-12) – (indicating the range of 1-12 months)
- day (int|str) – day of the month (1-31) – (indicating the range of 1-31 days)
- week (int|str) – ISO week (1-53) – (December 31, 2006 in the Gregorian calendar can be written as 2006-W52-7 (extended form) or 2006W527 (compact form))
- day_of_week (int|str) – number or name of weekday (0-6 or mon,tue,wed,thu,fri,sat,sun) – (indicating the day of the week, which can be represented by 0-6 or its English abbreviation)
- hour (int|str) – hour (0-23) – (indicating the range of 0-23 hours)
- minute (int|str) – minute (0-59) – (indicating the range of 0-59 minutes)
- second (int|str) – second (0-59) – (indicating the range of 0-59 seconds)
- start_date (datetime|str) – earliest possible date/time to trigger on (inclusive) – (indicating the start time)
- end_date (datetime|str) – latest possible date/time to trigger on (inclusive) – (indicating the end time)
- timezone (datetime.tzinfo|str) – time zone to use for the date/time calculations (defaults to scheduler timezone) – (indicating the time zone value)
Available Expressions for CronTrigger:
# Run at 00:00, 01:00, 02:00, 03:00 on the third Friday of June-August and November-December
sched.add_job(job_function, 'cron', month='6-8,11-12', day='3rd fri', hour='0-3')

# Run every Monday to Friday until 00:00:00 on 2024-05-30
sched.add_job(job_function, 'cron', day_of_week='mon-fri', hour=5, minute=30, end_date='2024-05-30')
6.3 Executor
The Executor is initialized in the scheduler, and can also be dynamically added through the scheduler’s add_executor. Each executor is bound to an alias, which is used as a unique identifier bound to the Job. During actual execution, the actual executor object is found according to the executor bound to the Job, and then the Job is executed according to the executor object.
The type of Executor is selected according to different schedulers. If AsyncIO is selected as the scheduling library, then AsyncIOExecutor is selected; if tornado is selected as the scheduling library, TornadoExecutor is selected; if starting a process is selected as scheduling, either ThreadPoolExecutor or ProcessPoolExecutor can be selected.
The choice of Executor needs to select different executors according to the actual scheduler. Currently, APScheduler supports the following Executors:
- executors.asyncio: Synchronous IO, blocking
- executors.gevent: IO multiplexing, non-blocking
- executors.pool: ThreadPoolExecutor and ProcessPoolExecutor
- executors.twisted: Event-driven
6.4 Jobstore
The Jobstore is initialized in the scheduler, and can also be dynamically added through the scheduler’s add_jobstore. Each jobstore is bound to an alias. When the scheduler adds a Job, it finds the corresponding jobstore in the scheduler according to the specified jobstore, and adds the job to the jobstore. The job store determines how tasks are saved. By default, they are stored in memory (MemoryJobStore) and will be lost after restart. The task stores supported by APScheduler are:
- jobstores.memory: Memory
- jobstores.mongodb: Stored in mongodb
- jobstores.redis: Stored in redis
- jobstores.rethinkdb: Stored in rethinkdb
- jobstores.sqlalchemy: Databases supporting sqlalchemy such as mysql, sqlite, etc.
- jobstores.zookeeper: zookeeper
Different task stores can be configured in the scheduler’s configuration (see Scheduler)
6.5 Event
Event is the corresponding event triggered by APScheduler when performing certain operations. Users can customize some functions to listen to these events and perform specific operations when certain Events are triggered. Common examples include the EVENT_JOB_ERROR event when a Job execution exception occurs. The EVENT_JOB_MISSED event when the Job execution time is missed.
Currently, Events defined by APScheduler:
- EVENT_SCHEDULER_STARTED
- EVENT_SCHEDULER_START
- EVENT_SCHEDULER_SHUTDOWN
- EVENT_SCHEDULER_PAUSED
- EVENT_SCHEDULER_RESUMED
- EVENT_EXECUTOR_ADDED
- EVENT_EXECUTOR_REMOVED
- EVENT_JOBSTORE_ADDED
- EVENT_JOBSTORE_REMOVED
- EVENT_ALL_JOBS_REMOVED
- EVENT_JOB_ADDED
- EVENT_JOB_REMOVED
- EVENT_JOB_MODIFIED
- EVENT_JOB_EXECUTED
- EVENT_JOB_ERROR
- EVENT_JOB_MISSED
- EVENT_JOB_SUBMITTED
- EVENT_JOB_MAX_INSTANCES
Listener represents some Events customized by the user to listen to. For example, when a Job triggers the EVENT_JOB_MISSED event, some other processing can be done according to requirements.
6.6 Scheduler
Scheduler is the core of APScheduler, and all related components are defined through it. After the scheduler is started, it will start scheduling according to the configured tasks. In addition to waking up the schedule according to the trigger time generated by the trigger of all defined Jobs. Scheduling is also triggered when the Job information changes.
The scheduling methods supported by APScheduler are as follows. The commonly used ones are BlockingScheduler and BackgroundScheduler
- BlockingScheduler: Suitable for when the scheduler is the only process running in the process. Calling the start function will block the current thread and cannot return immediately.
- BackgroundScheduler: Suitable for when the scheduler runs in the background of the application. The main thread will not be blocked after calling start.
- AsyncIOScheduler: Suitable for applications that use the asyncio module.
- GeventScheduler: Suitable for applications that use the gevent module.
- TwistedScheduler: Suitable for building Twisted applications.
- QtScheduler: Suitable for building Qt applications.
7. Implement Scheduled Tasks Using the Distributed Message System Celery
Celery is a simple, flexible, and reliable distributed system for processing large numbers of messages, while providing the tools needed to operate and maintain such systems. It can also be used for task scheduling. Celery’s configuration is quite cumbersome. If you only need a lightweight scheduling tool, Celery will not be a good choice.
Celery is a powerful distributed task queue that allows task execution to be completely separated from the main program and even assigned to other hosts for execution. We usually use it to implement asynchronous tasks and scheduled tasks (crontab). Asynchronous tasks such as sending emails, file uploads, image processing, and other time-consuming operations. Scheduled tasks are tasks that need to be executed at a specific time.
It should be noted that Celery itself does not have the function of storing tasks. Tasks must be stored when scheduling tasks. Therefore, when using Celery, you also need to use some tools with storage and access functions, such as message queues, Redis caches, databases, etc. The officially recommended one is the message queue RabbitMQ, and sometimes using Redis is also a good choice.
Celery architecture adopts a typical producer-consumer model, which mainly consists of the following parts:
- Celery Beat: Task scheduler. The Beat process reads the content of the configuration file and periodically sends the tasks that need to be executed when they expire in the configuration to the task queue.
- Producer: Tasks that need to be in the queue. Generally, users, triggers, or other operations enqueue tasks, which are then processed by workers. Those that generate tasks by calling the API, functions, or decorators provided by Celery and hand them over to the task queue for processing are all task producers.
- Broker: That is, the message middleware, which refers to the task queue itself here. Celery acts as a producer and consumer, and brokers are the places (queues) where producers and consumers store/obtain products.
- Celery Worker: Consumers that execute tasks, take tasks from the queue and execute them. Usually, multiple consumers are run on multiple servers to improve execution efficiency.
- Result Backend: Saves status information and results after task processing for query. Celery supports Redis, RabbitMQ, MongoDB, Django ORM, SQLAlchemy, etc. by default.
In practical applications, when a user initiates a request from the Web front end, we only need to throw the task to be processed by the request into the task queue broker, and the idle worker will process the task. The processing result will be temporarily stored in the background database backend. We can run multiple worker processes on one machine or multiple machines at the same time to achieve distributed parallel processing of tasks.
Celery Scheduled Task Examples:
- Python Celery & RabbitMQ Tutorial
- Celery Configuration Practice Notes
8. Implement Scheduled Tasks Using the Data Flow Tool Apache Airflow
Apache Airflow is a data flow tool open-sourced by Airbnb and is currently an Apache incubator project. It supports the ETL process of data in a very flexible way, and also supports many plug-ins to complete functions such as HDFS monitoring and email notification. Airflow supports both standalone and distributed modes, supports Master-Slave mode, supports resource scheduling such as Mesos, and has very good scalability. It is adopted by many companies.
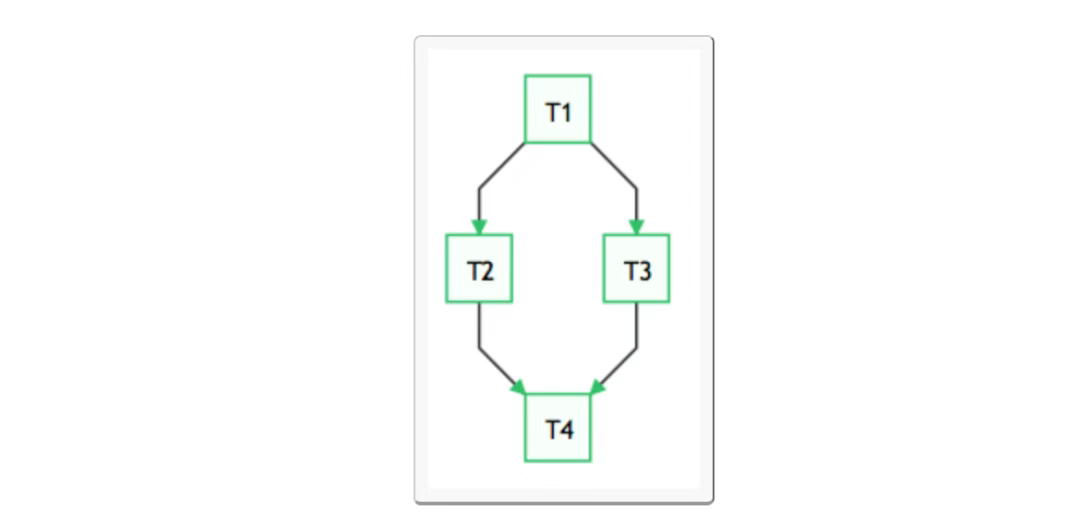
Airflow is developed in Python. It uses DAGs (Directed Acyclic Graph) to express the tasks to be executed in a workflow and the relationships and dependencies between tasks. For example, in the following workflow, tasks T2 and T3 can only start executing after task T1 is completed, and task T4 can only start executing after both T2 and T3 are completed.
Airflow provides various Operator implementations to complete various task implementations:
- BashOperator – Execute bash commands or scripts.
- SSHOperator – Execute remote bash commands or scripts (principle is the same as the paramiko module).
- PythonOperator – Execute Python functions.
- EmailOperator – Send emails.
- HTTPOperator – Send an HTTP request.
- MySqlOperator, SqliteOperator, PostgresOperator, MsSqlOperator, OracleOperator, JdbcOperator, etc., execute SQL tasks.
- DockerOperator, HiveOperator, S3FileTransferOperator, PrestoToMysqlOperator, SlackOperator…
In addition to the above Operators, you can also easily customize Operators to meet personalized task requirements.
In some cases, we need to execute different tasks according to the execution results, so that the workflow will generate branches.
This requirement can be achieved using BranchPythonOperator.
8.1 Background of Airflow’s Emergence
Usually, in a large system such as an operation and maintenance system, data analysis system, or test system, we have various dependency requirements. Including but not limited to:
- Time dependency: Tasks need to wait for a certain time point to trigger.
- External system dependency: Tasks depend on external systems and need to call interfaces to access.
- Inter-task dependency: Task A needs to start after task B is completed, and the two tasks will affect each other.
- Resource environment dependency: Tasks consume a lot of resources or can only be executed on specific machines.
Crontab can handle the need to execute tasks regularly very well, but it can only manage time dependencies. Airflow’s core concept DAG (Directed Acyclic Graph) – to represent the workflow.
Airflow is a WMS, that is: it treats tasks and their dependencies as code, schedules task execution according to those plan specifications, and distributes the tasks to be executed among the actual working processes.
Airflow provides an excellent UI for displaying the status of current active tasks and past tasks, and allows users to manually manage the execution and status of tasks.
A workflow in Airflow is a collection of tasks with directional dependencies.
Each node in the DAG is a task, and the edges in the DAG represent dependencies between tasks (forced to be directed and acyclic, so there will be no circular dependencies, leading to infinite execution loops).
8.2 Core Concepts of Airflow
- DAGs: Directed Acyclic Graph. Organize all tasks that need to be run according to dependencies, describing the execution order of all tasks.
- Operators: Can be simply understood as a class that describes what a specific task in the DAG needs to do. Among them, airflow has many built-in operators, such as BashOperator to execute a bash command, PythonOperator to call any Python function, EmailOperator to send emails, HTTPOperator to send HTTP requests, SqlOperator to execute SQL commands, etc. At the same time, users can customize Operators, which provides great convenience for users.
- Tasks: A Task is an instance of an Operator, that is, a node in the DAGs.
- Task Instance: A run of a task. In the Web interface, you can see that a task instance has its own status, including “running”, “success”, “failed”, “skipped”, “up for retry”, etc.
- Task Relationships: Different Tasks in DAGs can have dependencies, such as Task1 >> Task2, indicating that Task2 depends on Task1. By combining DAGs and Operators, users can create various complex workflows.
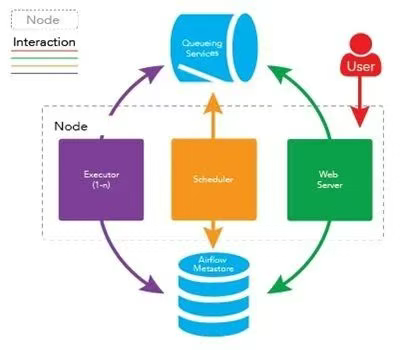
8.3 Architecture of Airflow
In a scalable production environment, Airflow contains the following components:
- Metadata Database: This database stores information about task status.
- Scheduler: The Scheduler is a process that uses DAG definitions combined with task status in the metadata to determine which tasks need to be executed and the priority of task execution. The scheduler usually runs as a service.
- Executor: The Executor is a message queue process that is bound to the scheduler and is used to determine the working process that actually executes each task plan. There are different types of executors, each using a class of specified working processes to execute tasks. For example, LocalExecutor uses parallel processes running on the same machine as the scheduler process to execute tasks. Other executors like CeleryExecutor use working processes that exist in a cluster of independent working machines to execute tasks.
- Workers: These are the processes that actually execute the task logic, determined by the executor being used.
The specific implementation of Worker is specified by the executor in the configuration file. Airflow supports multiple Executors:
- SequentialExecutor: Single-process sequential execution, generally only used for testing
- LocalExecutor: Local multi-process execution
- CeleryExecutor: Use Celery for distributed task scheduling
- DaskExecutor: Use Dask for distributed task scheduling
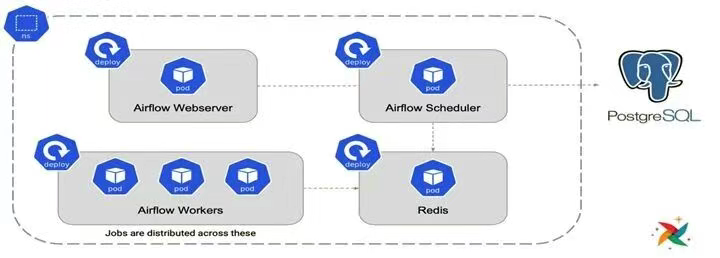
- KubernetesExecutor: Added in 1.10.0, create temporary POD to execute each task
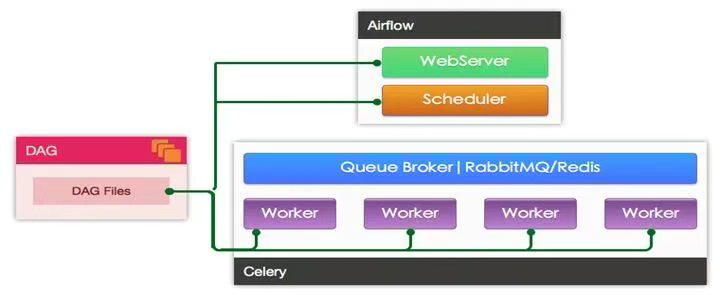
CeleryExecutor and KubernetesExecutor are generally used in production environments.
Architecture using CeleryExecutor is shown in the figure:
Architecture using KubernetesExecutor is shown in the figure:
Other References:
- Getting started with Apache Airflow
- Understanding Apache Airflow’s key concept